React Native – Apple 登入

安裝 React Native Apple Authentication

$ yarn add @invertase/react-native-apple-authentication
$ cd ios && pod install && cd ..

iOS

  • 設定:
    完整步驟 https://github.com/invertase/react-native-apple-authentication/blob/main/docs/INITIAL_SETUP.md
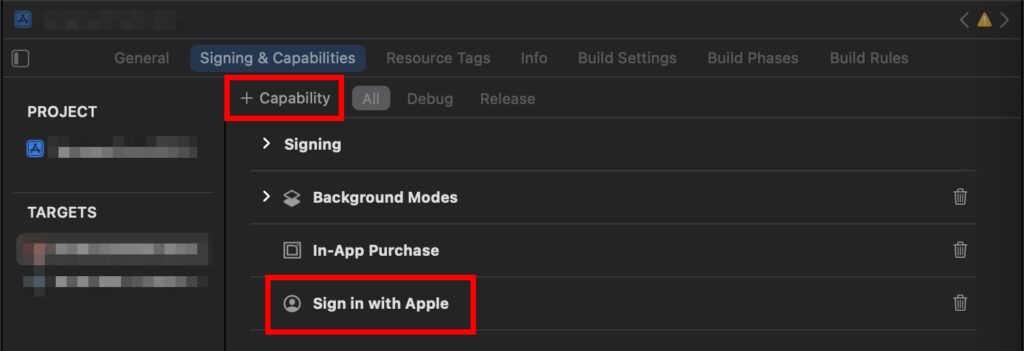
    • Xcode,直接在 Xcode Signing 新增 “Sign In with Apple”
    • developer.apple.com > Identifiers
    • 選擇一個 App ID 啟用 “Sign In with Apple” 做為主 App ID
      點擊選定的 App ID > 勾選 “Sign In with Apple” 後儲存
  • 程式範例:按照官方提供程式碼即可
  • 測試:
    1. 須在實機測試
    2. full name 和 email 只有第一次登入會返回,第二次開始都是 null。要重新測試,在實機 Settings > Apple ID, iCloud, iTunes & App Store > Password & Security > Apps Using Your Apple ID > 選擇此 App > Stop Using Apple ID,重新登入就可以再次取得 full name 和 email
    3. 如果首次登入後只需要取得 email,full name 仍是 null
      import { appleAuth } from '@invertase/react-native-apple-authentication';
      import { jwtDecode } from 'jwt-decode';

      const appleAuthRequestResponse = await appleAuth.performRequest({
      requestedOperation: appleAuth.Operation.LOGIN,
      requestedScopes: [appleAuth.Scope.EMAIL, appleAuth.Scope.FULL_NAME]
      });
      // other fields are available, but full name is not
      const { email, email_verified, is_private_email, sub } = jwtDecode(appleAuthRequestResponse.identityToken)
       

Android

  • 設定:android 需要額外設定,因為 android 是藉由 web authentication 方式
    參考 https://github.com/invertase/react-native-apple-authentication/blob/main/docs/ANDROID_EXTRA.md
    1. 參照 iOS 版完整設定
    2. android 額外設定:
      1. 新增一個 Service ID 綁定主 App ID
        點擊“+”新增 > 勾選“Services IDs”  到新增完成
      2. 點擊剛剛新增的 Services ID > 勾選 “Sign In with Apple” 後點擊旁邊的 “Configure”
        Return URLs 按需要填寫 ex. https://abc.com/apple-auth/callback
        Return URLs 會被套件攔截不會真的被使用,只要 domain 相符即可

Phoenix 安裝 – Mac

使用 asdf 安裝 elixir

$ asdf plugin add elixir
$ asdf install elixir latest # 安裝 Elixir 最新版
$ asdf global elixir latest # 設定全域使用
查看版本
$ elixir -v

交互介面
$ iex
Ctrl + c 兩次退出
 

使用 asdf 安裝 erlang

$ asdf plugin add erlang
$ asdf install erlang latest  # 安裝 Erlang 最新版
$ asdf global erlang latest  # 設定全域使用
查看版本
$ erl -eval 'erlang:display(erlang:system_info(otp_release)), halt().' -noshell

交互介面
$ erl
Ctrl + c 兩次退出


AppceleratorStudio – Memory Leaks

Memory Leak
http://docs.appcelerator.com/platform/latest/#!/guide/Managing_Memory_and_Finding_Leaks

教學

  • http://www.tidev.io/2014/03/27/memory-management/
  • http://blog.sina.com.cn/s/blog_62f189570101cows.html

如何檢查
http://www.lis186.com/posts/7640

原則

  • Don’t use global variables. If you think you need global variables, think again. Always use ‘var’ when declaring variables (they’re globals if you don’t).
  • Don’t create references to objects (use anonymous object instantiated inline). If you do create references, null them out when you’re done with them.
  • Encapsulate view creation in commonJS modules, which can be instantiated and then deallocated later. (Alloy helps with this because it is commonJS by default and a lot of older hand-rolled Classic code was not).
  • Destroy collections ($.destroy()) when using view/model binding & you’re done with the associated view
  • Don’t use, and watch out for implicitly-created closures unless you know what you’re doing and later deallocate those objects.
  • Set global event listeners (Ti.App.addEventListener, Ti.Geolocation.addEventListener, etc.) with care – in your top-level controller, remove as soon as you can, never more than once, etc.
  • Learn JavaScript. It’s not Java, C#, Ruby, etc. It works the way it works so be all zen-like and accept it. Learn about scoping, hoisting, prototypal inheritance, closures, etc. Yeah, it’s a lot to learn. But you’re a developer, you can do it.


Alloy

  • http://www.jamesdraper.info/blog/titanium-alloy-memory-tips

自製 tiles source – 使用 Geo-OSM-Tiles

  1. 安裝 Geo-OSM-Tiles-0.04
    wget http://search.cpan.org/CPAN/authors/id/R/RO/ROTKRAUT/Geo-OSM-Tiles-0.04.tar.gz
    tar -xf Geo-OSM-Tiles-0.04.tar.gz
    cd Geo-OSM-Tiles-0.04
  2. 安裝 LWP (LWP是一個Perl的 moudle)
    
yum install perl-libwww-perl
    perl Makefile.PL
    
make
    
make test
    
make install
  3. 到 http://www.openstreetmap.org/ 選取要的地圖範圍,記下經緯度
  4. 使用 downloadosmtiles.pl 下載所需的地圖,詳見官方說明 http://search.cpan.org/~rotkraut/Geo-OSM-Tiles-0.02/downloadosmtiles.pl
ex.
    downloadosmtiles.pl --lat=31.104:31.343 --lon=121.309:121.664 --zoom=13:18 --destdir=../Map_Shanghai


壓縮處理 Imagemagick

convert -strip -interlace Plane -quality 50% source.jpg result.jpg

-strip 移除圖片相關的註解或資訊
-interlace 隔行掃描 Plane 漸進式


Nginx 安裝SSL憑證

沃通免費SSL憑證申請
參考網址:https://45so.org/free-ssl.45so

Centos

安裝openssl

# yum install mod_ssl openssl

建立存放憑證資料夾,然後把申請到的2個憑證檔放入

# mkdir /etc/nginx/ssl

編輯虛擬主機設定檔

# vim /etc/nginx/conf.d/vhosts/test.abc.com.conf
加入
server {
#SSL
listen 443 ssl;
ssl on;
ssl_certificate /etc/nginx/ssl/1_test.abc.com_bundle.crt;
ssl_certificate_key /etc/nginx/ssl/2_test.abc.com.key;

重啟動

/etc/init.d/nginx restart

修改防火牆開放Port 443

完成


Cocos2d-JS (3) 開發前閱讀

手冊
http://cocos2d-x.org/docs/catalog/framework/html5/zh

  • 程式執行順序
    1. index.html
    2. frameworks/Cocos2d-html5/CCBoot.js => 讀入 project.json 設定
    3. main.js => 載入與初始化 project.json 中 modules/jsList 指定的 JavaScript 檔

  • 螢幕設定
    http://cn.cocos2d-x.org/article/index?type=cocos2d-x&url=/doc/cocos-docs-master/manual/framework/html5/v2/resolution-policy-design/zh.md

  • 啓動流程
    http://cocos2d-x.org/docs/manual/framework/html5/v3/cc-game/zh

基本啓動
main.js
cc.game.onStart = function(){
    //load resources
    cc.LoaderScene.preload(resource_list, function () {
        cc.director.runScene(new MyScene());
    }, this);
};
cc.game.run();

延遲啓動
cc.game.onStart = function(){
    //load resources
    cc.LoaderScene.preload(resource_list, function () {
        cc.director.runScene(new MyScene());
    }, this);
};
cc.game.prepare();

document.getElementById(“myBtn”).addEventListener(“click”, function(){
    cc.game.run();
});

  • 場景
    1. http://cn.cocos2d-x.org/tutorial/show?id=1212
    2. http://cn.cocos2d-x.org/article/index?type=cocos2d-x&url=/doc/cocos-docs-master/manual/framework/native/v2/basic-concepts/director-scene-layer-and-sprite/zh.md


Cocos2d-JS (2) 安裝 & Hello World

作業系統:Mac
Cocos2d-JS:3.8

參考網址:http://www.cocos.com/doc/article/index?type=cocos2d-x&url=/doc/cocos-docs-master/manual/framework/cocos2d-js/2-working-environment-and-workflow/2-2-cross-native-browser-game-with-cocos-console/zh.md

安裝步驟

  1. 下載 http://cn.cocos2d-x.org/download ,本次安裝 cocos2d-x-3.8
  2. 解開 zip,打開終端機
  3. cd path_to/cocos2d-x-3.8
  4. ./setup.py
  5. 要求輸入 NDK,Android SDK和ANT 路徑,這是開發Android用的,先按enter跳過
  6. 輸入完,~/.bash_profile 中會加入剛剛幾個路徑
  7. !! 若是資料夾名稱有空格須先手動修改.bash_profile,加單引號,例 ‘…Sync Drive…’
  8. source ~/.bash_profile 讓路徑生效
  9. 接下來就可以使用cocos console 建立專案了

建立專案

  1. cd work  #專案放置資料夾
  2. cocos new -l js –no-native hello #建立一個僅含Cocos2d-html5 的專案
  3. cd hello
  4. cocos run -p web
    Browser 會自動開啟並執行本專案


Cocos2d-JS (1) 版本選擇

遊戲要跨平台 (Web/手機):
採用 Cocos2d-JS Full Package 版本
下載:www.cocos.com/download/
參考:http://www.cocos.com/doc/article/index?type=cocos2d-x&url=/doc/cocos-docs-master/manual/framework/cocos2d-js/2-working-environment-and-workflow/2-2-cross-native-browser-game-with-cocos-console/zh.md

針對 Web:
分為 Lite Version / Full Version / Customized Version
只要引入單檔 js,可以像使用 jQuery 一般,直接使用,若是針對 Web 開發,是最方便的方式。
下載:http://cocos2d-x.org/filecenter/jsbuilder/
參考:http://www.cocos.com/doc/article/index?type=cocos2d-x&url=/doc/cocos-docs-master/manual/framework/cocos2d-js/2-working-environment-and-workflow/2-1-cocos2d-js-lite-workflow/zh.md

Cocos2d-JS单文件引擎使用指引
http://www.cocos2d-x.org/docs/manual/framework/html5/v3/lite-version/zh

Yii 安全性

  • XSS 攻擊
    Yii 的教學文章提到很多做法,基本上都是使用 CHtmlPurifier 來過濾,只是做的時間點不同,有的是save之前,有的是display之前,建議寫在 Model 的 rules 使用 filter 濾掉,不要每次打開頁面時在view裡頭做,浪費效能。

Model

public function rules(){
    return array(
        array('text','filter','filter'=>array($obj=new CHtmlPurifier(), 'purify'))
    );
}

config/main.php
加上 httponly 避免 cookie 被 javascript 讀取

'components'=>array(           
    'user'=>array(
        // enable cookie-based authentication
        'class' => 'WebUser',
        'allowAutoLogin' => true,
        'identityCookie' => array('domain' => 'www.abc.com', 'path' => '/', 'httpOnly' => true),
        'loginUrl' => array('site/top2login'),
    ),
    'session' => array(
        'cookieParams' => array(
            'httponly' => true,  //o小寫
        ),
    ),
),


  • SQL Injections
    若是使用 model 本身的方法來操作,並不需要特別注意這個問題,因為Yii 自己會進行處理,風險通常來自於自己寫SQL時,針對這點處理方式如下
$sql = "SELECT CONCAT(prefix, title) AS title, author_id, post_id, date "
    . "FROM t_comment "
    . "WHERE (date > :date OR date IS NULL) AND title LIKE :text"
 
$command = Yii::app()->db->createCommand($sql);
$results = $command->execute(array(':date' => $date, ':text' => "%{$text}%"));

使用 model 搭配 SQL 的變數處理

$comments = Comment::model->findAllBySql($sql, array(':date' => $date, ':text' => "%{$text}%"));


  • Cross-site Request Forgery (CSRF)
    !! 使用 Yii cookie 組件來操作 cookie,不要使用 $_COOKIES
    !! 使用 CHtml::form 建立表單,不要自己寫 Html form tag

config/main.php

'request'=>array(
    'enableCsrfValidation'=>true,  //CHtml::form
    'enableCookieValidation'=>true,//CHttpCookie
    'csrfCookie'=>array(
        'httpOnly'=>true,  //O大寫
    ),
),


參考
http://www.yiiframework.com/doc/guide/1.1/zh_cn/topics.security